Hidden web services using client-side certificates
How to have potentially insecure services exposed on the network, but hidden for everyone but trusted clients.
List of updates to this post since it was published:
Why
I have multiple services running on my VPS, on my homelab server and elsewhere.
All of these are connected via a VPN, so as I have a domain and nginx configured already exposing the services to the internet would be as easy as proxying a subdomain from the main server to a specific port of a VPN IP.
However, some of the services are not written with security in mind.
Some straight up don’t have even as much as a simple login/password authentication.
And even if they’d do, and even if I verified that they handle authentication properly, a vulnerability may be found that makes them an intrusion point.
Not to mention that if I exposed them directly even a simple authentication request spam would put a strain on the proxy, the target machine and my VPN network, possibly [D]DoS-ing every layer.
Therefore I’d rather put my trust in verifying the other side on the first layer possible (here the reverse proxy Nginx) using certificates, a mechanism that - as long as some simple precautions are made - is virtually impossible to defeat.
Idea
Considering all that, I wanted the said services to be available only - UND ONLY - to the clients I manually generate a certificate for and for everyone else to be transparently served the main website, in order to not even expose what services are there.
Client-side certificates are not very common but not rare either.
You might have encountered them as part of the authentication process on the more enterprise-y networks, be it VPNs (e.g. OpenVPN with password+cert authorization) or WiFi (WPA EAP, 802.1X or derivatives).
Using certs to allow access to, basically, a website is less common, but this could be also used for additionally securing an application running in a safety-critical environment (additionally, as it shouldn’t be the only layer!).
Plan
The plan was quite simple:
- generate a CA
- generate client certificates signed with that CA
- configure nginx to verify client-provided certificates against that CA
While simple, the plan skipped over multiple important and not necessarily trivial issues, but fret not, as they’re all described along the slightly twisty road.
While pondering the whole ordeal, I’ve also made a following list of arbitrary additional prerequisites or assumptions, with explanations and notes as subitems for your [un]comfort:
- As strong of encryption/protection as possible:
- in case any copy of any private key gets lost/stolen/leaked I want it to be basically un-brute-forcable, in case I don’t know about the fact;
- this should be the default approach anyway.
- Only 1 level of CA:
- in e.g. a corporate environment, you’d set up multiple levels of CAs with varying levels of privileges and validity time limits; the root CA would be e.g. stored on cold mediums and put in a safe and used only once every few years to renew the intermediary CAs;
- I’m doing this for myself, don’t have a safe cold storage solution, and also juggling multiple CA certs/keys/etc is a hassle not worth it for an individual;
- this means that the encryption from point 1 is even more important.
- Fully functional CRL:
- if, say, my phone with its cert gets stolen, I want to be able to invalidate just that one cert and not the whole tree;
- this means I have to keep a copy of all the client certs (but not keys) on the server and have them indexed in a way I can easily differentiate them.
- As automated client certificate generation and revokation as possible:
- shell scripts are fine but have to be easy to remember and well-parametrized with good defaults;
- ideally I’d love something akin to wg-portal or labca, but with more focus on the client certificates and with certificate usage limitation;
- I’d want it to be accessible from any of my machines without installing additional software, so non-web-based GUIs like gnoMint, TinyCA and XCA (seemingly the only maintained one) are not for me;
- I don’t want to deploy a full IdM like FreeIPA;
- I might explore the OpenXKPI in the future, but for now it’s a bit too much for my
humbleprimitive needs.
Execution
I’m running everything on the target system, running Debian 12.
This allows me to simplify some choices and designs and to skip the whole rabbit hole of passing private keys and other sensitive data from one machine to another, headaches with backups etc.
While this should be good enough for a homelab or safely(-ish) exposing some services to the internet for your private usage, proceed with caution and adjust everything accordingly if you’re not the only one using the infrastructure in your case.
CA
Certificate Authority is the root certificate that will be used to sign client certificates and then to validate the incoming ones.
I’ve generated mine using OpenSSL and commandline, because why would I complicate it for myself?
It works and is the de-facto standard.
The CA certificate itself is quite easy to generate, though gathering all the information on how to configure OpenSSL for that task in such a way that I can later on use the defaults was slightly more confusing.
OpenSSL configuration
First, I’ve modified the OpenSSL configuration file at /etc/ssl/openssl.cnf.
See this guide for more in-depth explanations.
The important modified bits (note that I’m not including whole sections!):
- in the
[ CA_default ]section:dir = ./my_awesome_CA # root dir of the CA; changed to ensure no conflicts with possible pre-existing files certificate = $dir/ca.crt.pem # file naming convention private_key = $dir/private/ca.key.pem # file naming convention new_certs_dir = $dir/certs # same as certs=, for consistency default_days = 1095 # my client certs will be valid for 3 years default_crl_days= 7 # shortened from default 30 default_md = sha256 # override from "default" x509_extensions = usr_cert_client # options added when signing other certs, see below copy_extensions = copy # copy requested extensions crl_extensions = crl_ext - in
[ req ]section:default_bits = 4096 req_extensions = v3_req - in
[ req_distinguished_name ]section - defaults set to my liking - in
[ req_attributes ]section - commented out everything - in a new
[ usr_cert_client ]extension section (this sets the generated client key allowed usage):basicConstraints=CA:FALSE subjectKeyIdentifier=hash authorityKeyIdentifier=keyid,issuer keyUsage=digitalSignature extendedKeyUsage=clientAuth - in
[ v3_req ]:subjectAltName = email:move #keyUsage = digitalSignature # commented out
Directory structure and files
This was a straightforward creation of the directories and files specified in the configuration file above.
sudo mkdir -p /etc/ssl/my_awesome_CA/certs
sudo mkdir -p /etc/ssl/my_awesome_CA/crl
sudo mkdir -p /etc/ssl/my_awesome_CA/private
sudo chmod 700 /etc/ssl/my_awesome_CA/private
sudo touch /etc/ssl/my_awesome_CA/index.txt
echo '01' | sudo tee /etc/ssl/my_awesome_CA/crlnumber
echo '1000' | sudo tee /etc/ssl/my_awesome_CA/serial
Generating the CA root certificate
Now for the fun part - generating the CA certificate:
# Generate the CA private key
sudo openssl genpkey -algorithm RSA -pkeyopt rsa_keygen_bits:4096 -aes-256-cbc -out /etc/ssl/my_awesome_CA/private/ca.key.pem
sudo chmod 400 /etc/ssl/my_awesome_CA/private/ca.key.pem
# Generate the CA cert itself
sudo openssl req -new -x509 -days 7300 -key /etc/ssl/my_awesome_CA/private/ca.key.pem -out /etc/ssl/my_awesome_CA/ca.crt.pem
sudo chmod 444 /etc/ssl/my_awesome_CA/ca.crt.pem
# Generate CRL
sudo openssl ca -gencrl -out /etc/ssl/my_awesome_CA/crl.pem
Backing it up
Kinda important, innit?
Further down the automation road I may add this to the automation scripts, so that any change in the generated certificates will result in a new backup dump.
But for now I’ve created a simple cron job, described near the end of this post.
And before that, I’ve done it manually to test it and to figure out how I want to do it - that’s what this section is about.
As the backups will include the private key of the CA, they should be protected with an additional password layer.
Note that while this is good enough for my use case, in a production environment I’d recommend having the root CA key backed up to an offline medium (e.g. a thumbdrive) and used by mounting said drive and pointing the OpenSSL config or commands at the file without ever having it on the system’s persistent storage.
Note (yes, again) that I’m using 7z (from the 7zip package) here for convenience - you could use zip or tar + gpg or any other method.
7z however doesn’t retain the ownership information, only permissions, so be careful about its application.
cd /your/backup/location
sudo 7zz a -p -mhe=on -r ca_$(date +%Y%m%d_%H%M%S).7z /etc/ssl/my_awesome_CA
sudo chown yourbackupuser:yourbackupuser ca_*
Generating client certificates
This is quite straightforward for anyone that played with certificates before: generate a private key, generate a certificate signing request using that key, generate a certificate based on the request signed using the root CA key and then export the client cert in a PKCS12-format bundle file.
I didn’t password-protect the client certificate key, as I did put a password on the whole exported PKCS12 bundle file.
Manual client certs
export CERT_CLIENT_NAME="testclient"
sudo openssl genpkey -algorithm RSA -pkeyopt rsa_keygen_bits:2048 -out /etc/ssl/my_awesome_CA/certs/$CERT_CLIENT_NAME.key
# Modify the subject data if needed
sudo openssl req -new -key /etc/ssl/my_awesome_CA/certs/$CERT_CLIENT_NAME.key -out /etc/ssl/my_awesome_CA/certs/$CERT_CLIENT_NAME.csr -subj "/C=PL/ST=MAZ/L=Warsaw/O=mjbogusz.dev/OU=client/CN=${CERT_CLIENT_NAME}"
# This will ask for the CA key password and confirmation (answer yes)
sudo openssl ca -in /etc/ssl/my_awesome_CA/certs/$CERT_CLIENT_NAME.csr -out /etc/ssl/my_awesome_CA/certs/$CERT_CLIENT_NAME.crt
# This will ask for an export password
sudo openssl pkcs12 -export -in /etc/ssl/my_awesome_CA/certs/$CERT_CLIENT_NAME.crt -inkey /etc/ssl/my_awesome_CA/certs/$CERT_CLIENT_NAME.key -certfile /etc/ssl/my_awesome_CA/ca.crt.pem -out /etc/ssl/my_awesome_CA/certs/$CERT_CLIENT_NAME.p12
# Copy the bundle somewhere for distribution, here to backup directory
sudo cp /etc/ssl/my_awesome_CA/certs/$CERT_CLIENT_NAME.p12 /your/backup/location
# Remove the client cert private key, CSR and bundle files as they're no longer needed (and to remove vulnerability paths)
sudo rm /etc/ssl/my_awesome_CA/certs/$CERT_CLIENT_NAME.{csr,key,p12}
Automatic client certs (script)
I’ve placed the script in /usr/local/bin/cert-gen-client.sh with permissions set to 744 (runnable only as root):
#!/usr/bin/env sh

set -e
set -u

if [ $# -ne 1 ]; then
	>&2 echo "Usage: $0 <client_name>"
	exit 1
fi
if [ `id -u` -ne 0 ]; then
	>&2 echo "This must be run as root."
	exit 2
fi

export CA_DIR=/etc/ssl/my_awesome_CA
export CERT_DIR="${CA_DIR}/certs"
export OUT_DIR=/your/export/location

# Gen key
openssl genpkey -algorithm RSA -pkeyopt rsa_keygen_bits:2048 \
	-out ${CERT_DIR}/$CERT_CLIENT_NAME.key

# Gen request
openssl req -new \
	-subj "/C=PL/ST=MAZ/L=Warsaw/O=mjbogusz.dev/OU=client/CN=${CERT_CLIENT_NAME}" \
	-key ${CERT_DIR}/$CERT_CLIENT_NAME.key \
	-out ${CERT_DIR}/$CERT_CLIENT_NAME.csr

# Sign
openssl ca \
	-in ${CERT_DIR}/$CERT_CLIENT_NAME.csr \
	-out ${CERT_DIR}/$CERT_CLIENT_NAME.crt

# Bundle
openssl pkcs12 -export \
	-in ${CERT_DIR}/$CERT_CLIENT_NAME.crt \
	-inkey ${CERT_DIR}/$CERT_CLIENT_NAME.key \
	-certfile ${CA_DIR}/ca.crt.pem \
	-out ${CERT_DIR}/$CERT_CLIENT_NAME.p12

# Export
cp ${CERT_DIR}/$CERT_CLIENT_NAME.p12 ${OUT_DIR}
chown mjbogusz:mjbogusz ${OUT_DIR}/$CERT_CLIENT_NAME.p12

# Cleanup
rm ${CERT_DIR}/$CERT_CLIENT_NAME.csr
rm ${CERT_DIR}/$CERT_CLIENT_NAME.key
rm ${CERT_DIR}/$CERT_CLIENT_NAME.p12
Revoking certificates
This part is quite important, as it provides a way to “disable” old client certificates in case they are replaced or the device with the certificate gets lost, stolen or any other scenario.
As the revokation is handled locally and the process verifying the certificate’s validity is also running on the same machine, I’ve used simple CRL (certificate revokation list) file and didn’t bother with OCSP.
Manual revokation
export CERT_CLIENT_NAME="testclient"
# Mark the certificate as revoked (in the index)
sudo openssl ca -revoke /etc/ssl/my_awesome_CA/certs/$CERT_CLIENT_NAME.crt
# Refresh the CRL (same command as when generating it for the first time)
sudo openssl ca -gencrl -out /etc/ssl/my_awesome_CA/crl.pem
# Reload nginx configuration to load the new CRL
sudo nginx -s reload
Automatic revokation (script)
Similar to the generation script, this one is placed in /usr/local/bin/cert-revoke-client.sh with 744 permissions.
#!/usr/bin/env sh

set -e
set -u

if [ $# -ne 1 ]; then
	>&2 echo "Usage: $0 <client_name>"
	exit 1
fi
if [ `id -u` -ne 0 ]; then
	>&2 echo "This must be run as root."
	exit 2
fi

export CA_DIR=/etc/ssl/my_awesome_CA
export CERT_DIR="${CA_DIR}/certs"
export CERT_CLIENT_NAME=$1

# Mark the certificate as revoked (in the index)
openssl ca -revoke $CERT_DIR/$CERT_CLIENT_NAME.crt

# Refresh the CRL (same command as when generating it for the first time)
openssl ca -gencrl -out $CA_DIR/crl.pem

# Immediately eload nginx configuration to load the new CRL
nginx -s reload
Nginx (HTTPS reverse proxy) configuration
As I’m already using nginx as my main http server and reverse proxy, I’ve decided to use it to check the client certificates as well.
If you prefer Apache, Caddy or any other proxy, they should be able to work for this purpose as well; Traefik or other edge routers not so much.
First test
For the first test I’ve set up a very simple configuration utilizing the default files included with the nginx package.
The ssl snippet is just the core SSL configuration from this post extracted to /etc/nginx/snippets/ssl.conf.
server {
	listen 443 ssl http2;
	listen [::]:443 ssl http2;

	# Random unused subdomain
	server_name cctest.mjbogusz.dev;
	server_tokens off;

	access_log /var/log/nginx/access_cctest.log;
	error_log /var/log/nginx/error_cctest.log;

	include snippets/ssl.conf;

	# Main client certificate validation
	ssl_client_certificate /etc/ssl/my_awesome_CA/ca.crt.pem;
	ssl_crl /etc/ssl/my_awesome_CA/crl.pem;
	ssl_verify_client optional;

	# Serve the default files
	location / {
		if ($ssl_client_verify != SUCCESS) {
			return 403;
		}
		root /var/www/html;
		index index.nginx-debian.html;
		try_files $uri =404;
	}
}
As you can guess, in case of certificate validation failure it responds with 403 Forbidden instead of transparently serving the main webpage, but I’ll sort that out some other time.
Apparently it’s not that common to NOT request the certificate but verify it…
Actual usage
Based on the first test and some experiments I’ve prepared this snippet, placed in snippets/ssl_client.conf:
listen 443 ssl http2;
listen [::]:443 ssl http2;

server_tokens off;

include snippets/ssl.conf;

ssl_client_certificate /etc/ssl/my_awesome_CA/ca.crt.pem;
ssl_crl /etc/ssl/my_awesome_CA/crl.pem;
ssl_verify_client optional;

if ($ssl_client_verify != SUCCESS) {
	return 403;
}
And now I can use it like this:
server {
	include snippets/ssl_client.conf;

	server_name anothersubdomain.mjbogusz.dev;
	access_log /var/log/nginx/access_anothersubdomain.log;
	error_log /var/log/nginx/error_anothersubdomain.log;

	location / {
		# Adjust the target, port and other proxy params here
		proxy_pass http://127.0.0.69:31337/;
		# Typical proxy params:
		proxy_http_version 1.1;
		proxy_set_header Host $host;
		proxy_set_header Upgrade $http_upgrade;
		proxy_set_header Connection "Upgrade";
		proxy_set_header X-Forwarded-For $proxy_add_x_forwarded_for;
	}
}
Client configuration
At this point, I had almost everything.
CA, client certificate bundles, nginx serving my services.
The only missing piece were the clients providing the certificates.
So here’s how I went about it.
Linux
Now, this one is a bit complicated - unnecessarily in my opinion, but it is what it is.
First obstacle is that different programs use different databases of certificates or different places to store them (see archlinux wiki), so I’ve merged the Firefox (my main use case) and others using the instructions from Mozilla.
Then, importing the certificate becomes as simple as:
pk12util -d ~/.pki/nssdb/ -i /path/to/pkcs12.bundle.file.p12
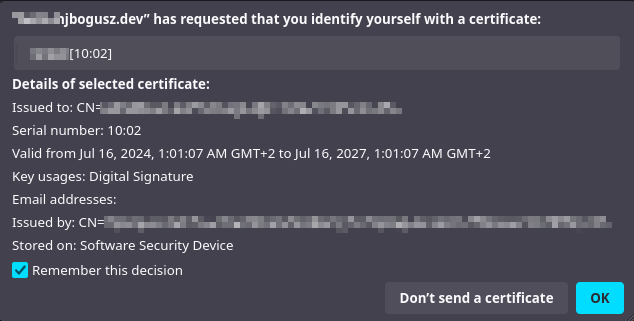
After that, opening one of my certificate-protected services in my browser of choice (Mozzarella Firefox) resulted in a certificate selection pop-up, defaulting to the imported certificate.
Windows
Configuring client-side certificates in Windows is very straightforward.
Screenshots included are from Windows 10, but this is probably the same since XP and isn’t likely to change for another 10 years.
-
Run
certmgr.msc, right click thePersonaldirectory (don’t worry if you don’t haveCertificatessubdirectory, it’ll be created automatically),All Tasks->Import...: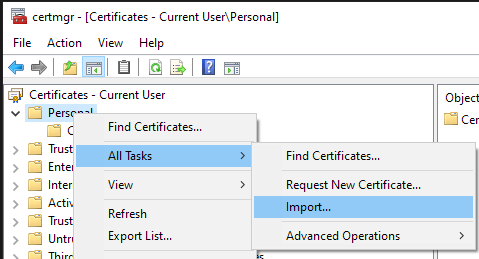
-
On the first screen simply select
Next, then browse for the generated PKCS12 bundle file.
To see the file on the list, change the expected file type: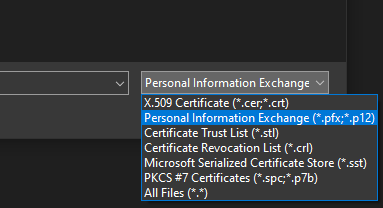
-
On the
Private key protectionscreen, enter the export password: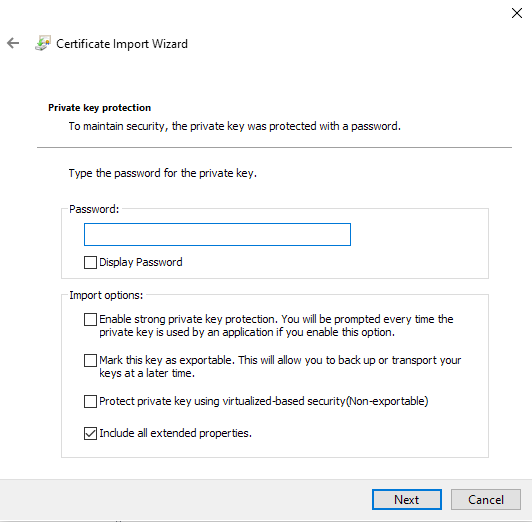
- Place the certificate in the
Personalstore (default) - Finish the import
- Open your web browser, navigate to a cert-protected page and the browser should ask for the certificate to use
- Profit!
Android
On newer Android versions (my phone uses 14, so if your phone is older, YMMV) it’s even simpler than on Windows.
- Navigate to the bundle file location using your preferred file manager and open the file - it should ask to use the certificate manager by default.
-
Provide the bundle file password, set at the export stage:
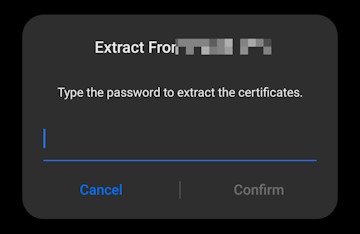
- Proceed to import as “VPN and client usage”
-
Enter a name for the imported certificate
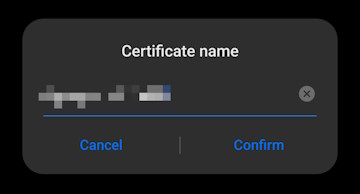
- You’re done!
-
When using an app, requiring access to a certificate-protected website, it should ask which certificate to use, like so:
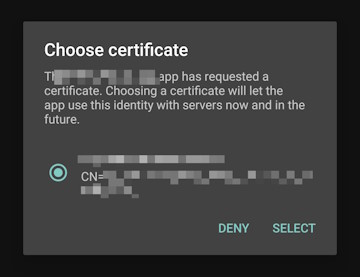
The only caveat is that Firefox for Android doesn’t use the system’s certificate storage and there’s no easy way to do it besides some ADB hackery…
But that’s an exercise for another day.
Automatic maintenance
The main part of the setup is done, now to sit back and relax… Almost.
You might have noticed I like automation, that’s one of the reasons I’m in IT.
So I’ve automated the maintenance of the system, which mostly consists of 2 parts: CRL regeneration and backups.
As you may have noticed, I’ve set the default_crl_days to 7.
This means that the CRL generated will be valid for only 7 days and if left to its own devices would yield unpredictable behavior depending on the software trying to validate a certificate against it.
Backups don’t really require explanation.
Only note here is that my certificate generation and revokation scripts don’t trigger creation of a new backup, as I don’t see myself running these multiple times a week (most likely I’ll touch these again in a year or so).
For both of these I’m using a simple, single cronjob, as if the CRL export fails then the backup would be invalid anyway.
So, in a new /usr/local/sbin/cert-maintenance.sh script (this time with permissions 700):
#!/usr/bin/env sh

set -e

if [ `id -u` -ne 0 ]; then
	>&2 echo "This must be run as root."
	exit 1
fi

# Settings
export CA_DIR=/etc/ssl/my_awesome_CA
export BACKUP_LOCATION=/your/backup/location
export BACKUP_OWNER=mjbogusz

export CERT_PASS_FILE=/etc/ssl/my_awesome_CA/private/pass.txt
export BACKUP_PASS_FILE=/etc/ssl/my_awesome_CA/private/pass_backup.txt

# Helper vars
export TIMESTAMP=$(date +%Y%m%d_%H%M%S)
export BACKUP_FILE=$BACKUP_LOCATION/ca_$TIMESTAMP.7z
export CERT_BACKUP_PASS=$(cat $BACKUP_PASS_FILE)

# Refresh the CRL
/usr/bin/openssl ca -gencrl -out $CA_DIR/crl.pem -passin file:$CERT_PASS_FILE

# Refresh nginx to reload the new CRL
/usr/sbin/nginx -s reload

# Create a new backup
/usr/bin/7zz a -p"$CERT_BACKUP_PASS" -mhe=on -r $BACKUP_FILE $CA_DIR > /dev/null
/usr/bin/chown $BACKUP_OWNER:$BACKUP_OWNER $BACKUP_FILE
And then in /etc/cron.d/cert-maintenance (this file must have 600 permissions!):
0 0 */3 * * root /usr/local/sbin/cert-maintenance.sh 2>&1 | logger -it cert-maintenance
Just remember to create the password files without trailing newlines and to set them to 400 permissions for root user.
For checking the maintenance script logs, if needed, use sudo journalctl -t cert-maintenance.
Updates
2024-10-03
Updated the cert-maintenance.sh script to use full paths for binaries, as it was failing due to nginx not being in PATH for cron.
Also, added output redirection to logger for the related cronjob.
Sources
- https://openssl-ca.readthedocs.io/en/latest
- https://arcwebtech.com/insights/articles/securing-websites-nginx-and-client-side-certificate-authentication-linux/
- https://fardog.io/blog/2017/12/30/client-side-certificate-authentication-with-nginx/
- https://viktorbarzin.me/blog/13-client-side-certificate-authentication-with-nginx/
- https://improveandrepeat.com/2020/09/how-to-create-self-signed-client-side-ssl-certificates-that-work/
- https://wiki.archlinux.org/title/OpenSSL